
Have you ever spent hours setting up a green screen, hit the "Chroma Key" button, and watched your video turn into a fuzzy, glowing green nightmare? It is incredibly frustrating when you spend your hard-earned money on recording equipment, only to have your footage look like a cheap weather report. I know exactly how that sudden panic feels, but the good news is that your editing software is completely fine. Let me show you how to fix your real-world lighting so you can get a flawless, professional key with just one click.

📌 Quick Summary: The Perfect Green Screen Setup
- The 6-Foot Rule: Always stand at least six feet away from your fabric so you do not cast dark shadows on the screen.
- Two-Layer Lighting: Light your background entirely separately from your body to create a smooth, flat wall of green.
- Use a Garbage Mask: Draw a tight crop box around your body before you use the chroma key. This hides messy bedroom walls and speeds up rendering!
- Fix the Spill: Always turn on your software's "Spill Suppression" to neutralize ugly green reflections on your shoulders and hair.
The Invisible Physics: Why Lighting is Your Real Key
Most beginners assume that the software's automatic keying tool is a magical program that can fix any bad video. They buy a cheap green sheet, hang it loosely on a wall with wrinkles everywhere, and throw a single bright light directly at themselves.
This is the absolute fastest way to guarantee an ugly, blurry result. The software does not actually look at you; it looks at the color value of the background.
If your background has dark wrinkles and uneven shadows, the computer sees dozens of completely different shades of green. It simply cannot decide which shade to erase, leaving you with patchy, half-dissolved borders around your body.
Let us look at a simple painting analogy.
Imagine trying to paint a wooden wall with a beautiful, solid coat of bright white paint. If the wall is covered in deep cracks, holes, and dust, the new paint will look bumpy, uneven, and highly unprofessional.
Your green screen is exactly like that wooden wall. You must paint it perfectly with even, balanced light before the computer can key it out smoothly.
Did You Know? The Shadow Trap
When a computer software looks at a dark, shadowy wrinkle on your green screen, it does not see "green." Mathematically, it actually sees black or dark brown pixels. This is exactly why your software leaves massive, ugly gray holes in your background when you try to key it out!
The Two-Layer Lighting Rule
To get a flawless key, you must treat your setup as two entirely separate layers: the background layer and the subject layer. You must never try to light both layers using the exact same light source.
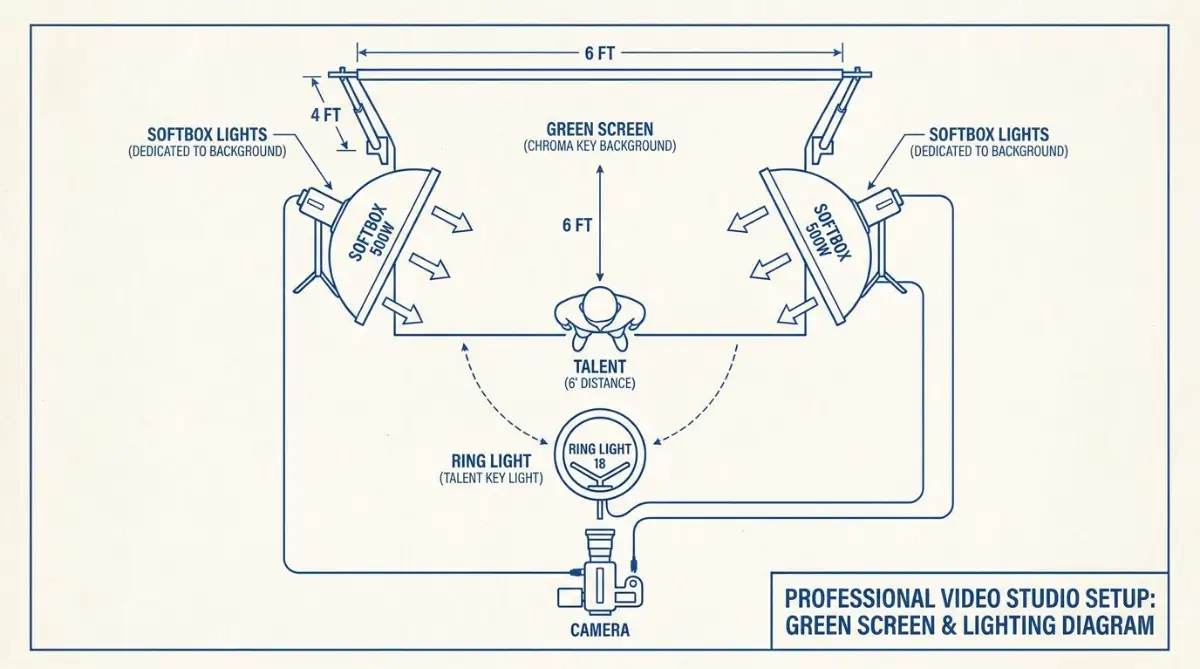
First, set up two matching softbox lights on the left and right sides of your green screen. Point them directly at the green fabric at a forty-five-degree angle.
This creates a perfectly smooth, shadow-free wall of solid green light behind you.
Second, step at least six feet away from the green screen before you set up your main camera light. Walking forward is a highly important secret because it prevents your body from casting dark shadows onto the green screen.
It also prevents a dangerous phenomenon called green spill. Green spill happens when the bright light bouncing off the green fabric reflects onto your shoulders and hair, making the software erase parts of your actual body.
Pro Tip / Expert Insight:
Always check the exposure levels on your camera screen before recording. Your goal is to make the green screen look entirely flat and boring, with absolutely zero bright spots or dark corners. If the green background looks perfectly uniform on your screen, the software's automated keying tool will easily erase it in a single click.
Decoding the Color Picker: The Science of Color Selection
Once you have recorded your clean, evenly lit footage, it is time to bring it into your editing software. Almost every modern video editor has a dedicated tool called the "Chroma Key" or "Ultra Key" effect.
The very first step is using the digital eyedropper tool to select the exact shade of green you want to erase. Many beginners make the mistake of clicking on the brightest spot on the screen.
This is a critical mistake because it leaves the darker, shadowed areas untouched, creating a messy outline.
Instead, you must zoom in closely and select a mid-tone green shade that represents the average color of your background. Let us explore the exact sliders you must adjust to clean up the edges perfectly.
Quick Edge Fix: The Slider Matrix
Myth vs. Reality:
The Myth: You need expensive, high-end professional editing software to get a clean green screen key.
The Reality: Even basic, free editing apps can produce Hollywood-quality results if your background is lit evenly. The physical lighting setup on your wall matters ten times more than the brand of software on your computer.
Master the Matte Cleanup Sliders
Once you select your primary green shade, the software will generate a black-and-white mask called a Matte. In this view, everything that is completely black will be erased, and everything that is solid white will remain visible.
If your white silhouette looks fuzzy or has gray holes inside it, your key is dirty. You need to adjust three specific sliders to polish the edges safely:
- Pedestal / Tolerance: This slider controls how aggressive the software is at erasing darker shades of green. Slowly push this slider upward until the shadowed corners of your background turn completely black.
- Choke / Contract: This highly important tool physically shrinks the edges of your white silhouette inward by a few pixels. It is like using a pair of digital scissors to trim away the thin, fuzzy green outline around your hair.
- Feather / Softness: Once you have choked the edges, use this slider to add a very subtle, microscopic blur to the borders. This prevents your body from looking like a sharp, artificial paper cutout against the new background.
The Magic of Spill Suppression
Even with a perfect lighting setup, a tiny amount of green light will always reflect onto your shoulders and face. This is the ultimate giveaway that a video was recorded on a green screen.
To fix this, you must locate the Spill Suppression or Color Spill control panel in your effects menu. This smart tool automatically identifies any green reflections on your body and neutralizes them.
It slowly shifts those greenish tints into neutral gray or warm skin tones, making you blend seamlessly into your new background.
Your Actionable Checklist:
- Move your body at least six feet away from the green wall.
- Use two separate lights dedicated only to the green screen.
- Use the digital eyedropper to select a mid-tone green shade.
- Adjust the choke and feather sliders to smooth out fuzzy edges.
- Turn on spill suppression to neutralize green reflections on your clothes and hair.
By following this highly structured, logical approach, you take complete control of the post-production process. You stop guessing and start creating clean, beautiful videos that look like they were recorded in a professional studio.
My absolute biggest mistake early on was standing right next to my green screen because my bedroom was so tiny. I did not realize that my own body was casting dark shadows onto the fabric, while the bright green light was bouncing off the wall and reflecting directly onto my shoulders. The very day I finally moved my desk and stood six feet away from the green screen, those ugly green borders vanished instantly without me even touching the software sliders.
Advanced Secrets for Flawless Chroma Key Compositing
Now that you understand the basic physical setups and the science of using three-point lighting, it is time to explore pro-level keying strategies. You must move beyond the basic automated tools inside your editing program and learn how to manage color data manually.
According to digital archiving guidelines from the National Archives, preserving the original uncompressed quality of your video file is highly important before you attempt any advanced post-production work. If you compress your video too much during the export phase, your editing software will lose the valuable color data it needs to separate your body from the green screen.
If you make too many costly post-production errors, you might end up wasting your entire business production budget. You do not want to be forced into researching how to get unsecured loans with bad credit and actually get approved just to pay for an emergency studio rebuild.
Learning how to execute editing presets takes strict attention. Failing to prepare your lighting is just as bad as practicing costly study habits that secretly sabotage your exam grades before a major test; it guarantees a painful, messy failure.
Let us explore the advanced, pro-level secrets you can use to build an unbreakable, clean key today.
The Magic of the Garbage Mask Technique
One of the biggest secrets that professional Hollywood editors use is called a garbage mask. Beginners often try to make their green screen cover the entire background of the room, from the floor to the ceiling.
This is incredibly difficult to do, especially if you are working in a tight home studio. Instead of trying to light a massive wall of green fabric, you only need to cover the immediate area directly behind your body.
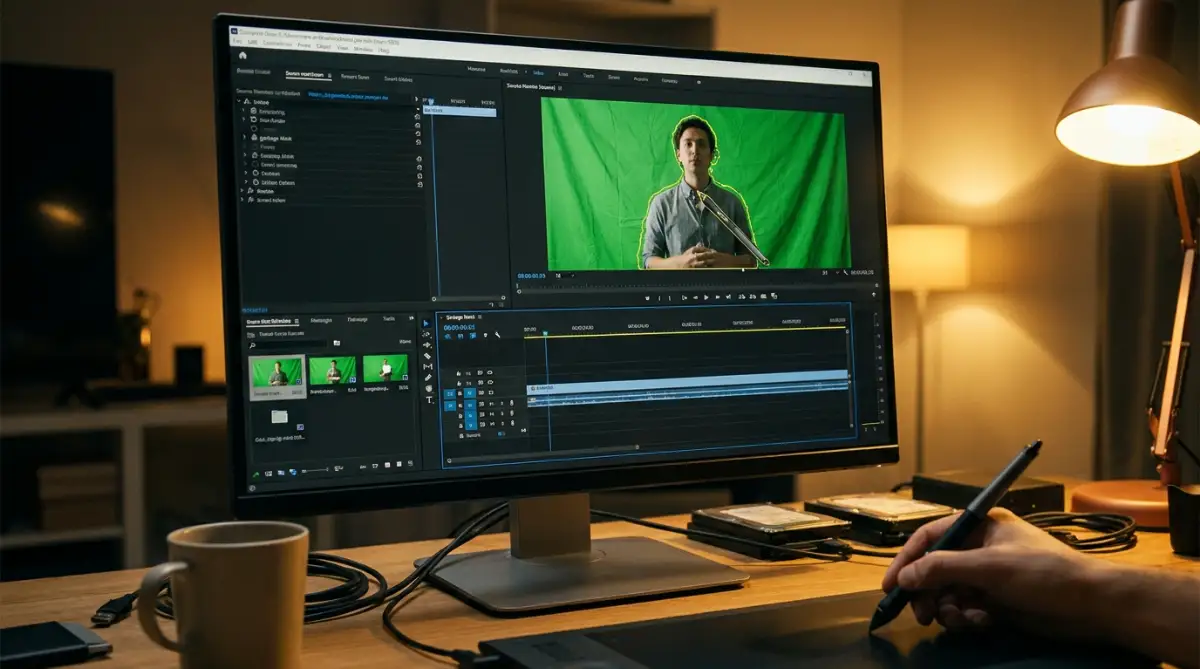
How to execute this tonight: Use your software's pen tool or a simple crop effect to draw a rough shape tightly around your body.
We call this rough shape a garbage mask. This tool instantly crops away the rest of your messy bedroom, including the light stands, the ceiling, and the edges of the walls.
Once the garbage mask is in place, the chroma key software only has to focus on the tiny patch of green screen directly behind you. This drastically reduces the workload on your computer's processor, allowing the system to run much smoother and render the video significantly faster.
The Art of Color Spill Neutralization
Even with the most perfect lighting setup, a tiny amount of green light will always bounce off the screen and reflect onto your hair and shoulders. This green reflection is called "spill," and it is the ultimate giveaway that a video was shot on a green screen.
To fix this, you must use your software's built-in spill suppressor. This tool automatically identifies any green hues on your body and neutralizes them.
It slowly shifts those greenish tints into a neutral gray or a warm skin tone, making you blend seamlessly into your new background.
It is a highly necessary step to ensure that you do not look like a cheap paper cutout pasted onto a fake digital background.
Silent Post-Production Mistakes That Ruin Your Videos
Before you export your next video project, watch this highly helpful video that shows you the exact post-production mistakes that ruin your green screen look. It breaks down the most common errors in a simple, visual way, so check it out and then read the guide below!
Many editors mistakenly believe that if their final video has no green edges, their work is completely finished. This dangerous assumption leads to quiet, daily habits that slowly destroy the visual quality of your project.
Let us look at a very common, highly destructive scenario that happens in home studios every single day. Imagine an excited content creator named John who just recorded a high-end tutorial.
For the first hour of editing, he does an amazing job setting up his keying tools and removing the background. But as he gets tired, he starts rushing the remaining steps to export the video faster.
He slaps a bright, sunny beach background behind himself, but completely forgets to adjust the color temperature of his own body. He looks cold, pale, and blue, while the beach behind him is glowing with warm, orange sunlight.
The Uncanny Valley Trap
This massive visual mismatch instantly triggers the "uncanny valley" effect in your viewer's brain. Even if they do not understand video editing, their eyes will immediately realize that something looks highly unnatural and fake.
Your viewers will lose trust in your content because your video looks cheap and unpolished. You must actively match your lighting, shadows, and color temperatures to make the two separate layers look like they were recorded in the exact same physical space.
Do's and Don'ts For Professional Compositing:
- DO use a color correction tool to match your skin tones with the lighting of your new background.
- DO NOT use the automated eyedropper tool on a wrinkled area of your green screen fabric.
- DO apply a very subtle blur to the edges of your keyed footage to blend into the new environment.
- DO NOT wear green clothing or reflective jewelry during your recording sessions.
Ignoring the Frame Rate Sync
Another massive, rarely discussed mistake is ignoring your camera's frame rate and shutter speed during the recording phase. If you record your video at twenty-four frames per second with a slow shutter speed, your hands will naturally look blurry when you wave them.
This natural motion blur is a complete nightmare for chroma key software. The computer cannot decide where your hand ends and where the green background begins, causing your fingers to look pixelated and partially dissolved.
To fix this, you must always record your green screen videos at a higher shutter speed, such as one-one-hundredth of a second. This faster speed eliminates motion blur, keeping your edges perfectly sharp and clean for the software.
The Trap of Over-Keying
When beginners see a tiny speck of green light on their shoulders, their first instinct is to push the software's tolerance slider as high as possible. This aggressive over-keying is a massive mistake.
When you push the settings too far, the software starts erasing your actual clothing, your teeth, and the edges of your face. Your body will look semi-transparent, and parts of the background will start showing through your shirt.
Instead of using one aggressive keying effect, you should use two separate, gentle keying effects. Apply the first key to clean up the easy outer edges, and use a second, softer key to fix the delicate areas around your hair.
Your Video Editing Action Plan For Tomorrow
Creating professional green screen videos does not have to be a scary or overwhelming experience. You now hold the exact same strategic knowledge that professional Hollywood visual effects artists use to create massive blockbuster movies.
By taking a few extra minutes to separate your lighting and clean up your digital boundaries, you completely remove the fear of a ruined project. You are no longer crossing your fingers and hoping the software's automatic tools save your video.
Instead, you are confidently directing your own virtual studio and protecting your visual quality. This simple change in your creative routine gives you incredible power over your entire post-production future.
Your Master Checklist for Your Next Video:
- Step Away from the Screen: Make sure your physical body is standing at least six feet away from the green wall before you hit record.
- Audit Your Lights: Ensure you have two dedicated lights shining evenly on the green fabric, completely separate from your main key light.
- Apply the Garbage Mask: Crop away the messy outer edges of your room before you even touch the chroma key tool.
- Suppress the Spill: Use your software's spill suppression tools to turn those ugly green reflections into natural, neutral skin tones.
Your videos are the ultimate reflection of your creative vision and your brand's professional standards. Do not let basic lighting mistakes or rushed editing habits force you to publish unpolished, cheap-looking content.
Read the software settings slowly, take your time with the manual sliders, and take complete, fearless control of your creative journey starting right now.
Looking back, surviving those frustrating early editing disasters actually forced me to stop relying on automatic presets and start acting like a professional filmmaker. You do not need to buy an expensive Hollywood studio to make gorgeous, clean videos, so please do not give up on your project just yet. Set up your two-layer lights tonight, take your time with the manual sliders, and take complete control of your creative journey today!
Common Questions About Perfecting Green Screen Keying
Why do I keep getting fuzzy, glowing green borders around my hair in video editing?
Fuzzy green borders happen when your green screen fabric is unevenly lit or wrinkled, forcing the computer to guess different shades of green. You can easily fix this by using two dedicated softbox lights to illuminate the background evenly while standing at least six feet away from the wall.
Do I need expensive, high-end professional software to get a clean chroma key?
Even basic, free video editing apps can produce studio-quality results if your physical background is lit correctly. The physical lighting setup on your wall matters ten times more than the specific brand of software on your computer.
What is a garbage mask and why is it important in video editing?
A garbage mask is a simple shape tool used to crop away the messy outer edges of your room like light stands and walls before you apply any keying effects. This hides unnecessary background details and drastically reduces the workload on your computer's processor.
How do I stop green light from reflecting onto my shoulders and clothing?
Green light reflections, or "spill," happen when bright light bounces off the fabric and hits your body. You can completely neutralize this by using your software's built-in spill suppressor to automatically turn those green hues into neutral skin tones.
Why do my hands look blurry and pixelated when I wave them around on camera?
Blurry hands are usually caused by a slow camera shutter speed that creates natural motion blur during movement, which confuses the keying software. Always record your green screen footage at a faster shutter speed, such as one-one-hundredth of a second, to keep your edges sharp and clean.
Disclaimer: The information provided in this article is for educational and general informational purposes only and does not constitute professional technical support or software-specific instruction. Video editing systems and computer hardware requirements vary heavily by brand, operating system, and specific project needs. Always consult with your software's official user guide or a certified video production professional regarding the exact specifications and hardware requirements of your personal editing system.